
If you want your LED light to work for you effectively, you must know how to install resistors for LED turn signals motorcycles. However, a resistor is too essential to control electrical emission.
You are just working with a resistor while fixing LED or wiring a relay. You need to install a resistor and the LED turn signal motorcycle to prevent the unnecessary hyper flash issue.
However, knowing the installing procedures of a resistor is necessary to prevent the load on your motorbike’s electrical structure. So, let’s start!
What the purpose to Use Resistor Is
There are several purposes to use a resistor on your motorcycle. We use a resistor to control the electrical current in a circuit. Usually, a resistor is made of copper or carbon.
In general, we use a carbon resistor for our Led turn signal motorcycle. Besides, you will find a resistor in all kinds of electronic networks and circuits.
However, you can measure a resistor through OHM. Here the ratio of measuring a resistor is- R=V/I. Resistor reduces fault messages from emerging on a motorcycle to bike dashboard.
What Filaments of a Resistor Are

There are two types of filament you will get on a filament.
- Single Filament.
- Double Filament.
Single Filament Bulb: 1156, 3156, and 7440 these three numbers are not just numbers. These are the wires that represent two wires. And, here, one is called positive wire while another one is negative wire.
You need to tap your resistor between these two positive and negative wires at your resistor installing time.
Double Filament Bulb: 1157, 3157, 7443 are three wires of the dual filament bulbs. And these are called-
- One Shared- Negative Bulb.
- Positive Dim Mode.
- Positive Blinker Mode.
At your resistor installation time, we recommend using a test light before you begin your installation procedures.
Reason Why the LED Turn Signals require Resistors
While you use traditional turn signals, you have no headache with resistors. It is because the conventional turn signals have a kind of bulb that is called an incandescent bulb. For that reason, the turn signals keep flashing frequently, and the riders can understand that easily.
But, in the case of LED turn signals, you will get the incandescent bulbs available. As a result, the LED turn signals work through lower wattage. And, when those turn signals keep flashing, the riders cannot understand in most cases.
So, here, the LED turn signals need to get the assistance of resistors to draw enough power to the LED circuit blinkers. A resistor can help the circuit act effectively.
How to Install Led Turn Signals on a Motorcycle
Before knowing how you can install LED turn Signals resistor motorcycle, you should know a bit about what the LED Turn Signals fixing means.
However, while you have a motorbike with 12-volt, its circuit will suit the LED Turn Lights. And, installing these lights with your own is straightforward, which means a widespread acceptance among many riders.
However, let’s learn how you can install LED Turn Lights. There are two most popular ways to install LED Turn Lights. Let’s see what they are-
- Install Using Head-Light Grills
Following this method, you have to use a headlight grill to stick it to the bike (front side). Now, escalate your light with the grill. It will surely bring a fantastic look to your motorcycle.
Here you have another opportunity to use this method that you can take the lights off the bike and can use them for another bike. This step is cool to tell you how to install resistors for LED lights. It is amazing!
- Escalating with the Headlight
Another novel method is to mount the turn light on your bike headlight. But this method will require you some equipment, for instance- headlight brackets. You will find this method too common to follow.
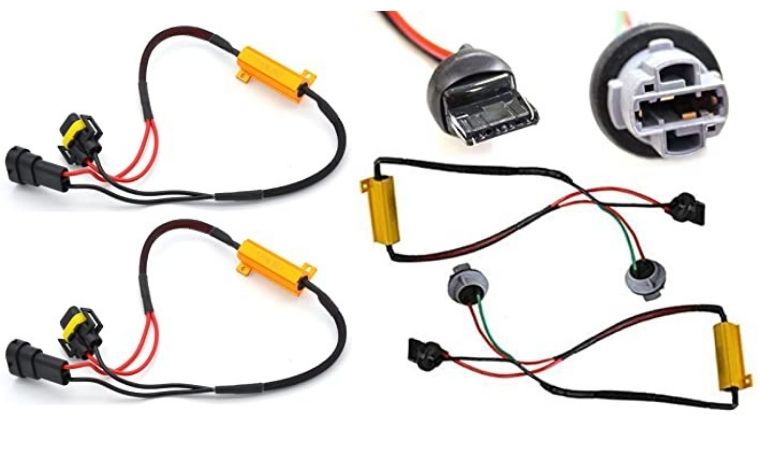
Installing Load Resistors for LED Turn Signals
The users get it more efficiently by installing a load resistor for a bike rather than for a car. It also saves money. However, let’s go to learn how you can install resistors for LED Turn Signals.
We will introduce five steps to you so that you can install your resistors as simply as you can. And, these will be the easiest ways of LED turn signals resistor installing methods of all kinds.
- Step-1
People say that there are two types of wire where one is negative, and one is positive. Although it sounds like two wires, there are three wires. These three wires mean two wires indeed.
Among these three wires, you will get one red, one blue, and one black wire. Among them, the black one is called the negative, and the red and blue wires are called positive.
However, tap the load resistor wire between the negative and positive wires.
- Step-2
In the double filament applications, you will get three wires. Now, tap the resistor between the wires that are brighter and the least wire color.
- Step-3
While you finish tapping the wires, test them whether they are working. If you find the turn signals are still hyper flashes, then try another wire.
- Step-4
In step 4 of LED resistor installing procedures, if you still find the hyper flashes problem, then the problem must happen with the connection. In this condition, you try T-Tap installing procedures. It is pretty easy.
Since the T-Tap often causes the loose connection, we prefer you to directly merge the load resistor to the stock control.
- Step-5
Now you have to join the wires. Use a wire stripper not to damage anything while exposing the copper wire. You can also use a scissor too. Now cover the whole connection using electrical tape and mount the resistor to the metal.
FAQ
How Many Resistors Do I Have To Use For Each Of My LED Turn Signals Motorcycles?
You need only one resistor for each of your LED turn signals.
How Will I Understand Whether The Resistor Has Gone On A Negative Or Positive Side?
Well, the resistor doesn’t have any sides like positive or negative. So, the way you will hook the resistor will work fine means it is suitable for each of the sides of LED signals.
By the way, you need a resistor to limit the flow of current through your LED signals.
Should I Install LED In Terms Of A Series, Or Can I Install It In A Parallel Way?
The current limit is the same in series components, but it differs in fluctuating voltages. Yet, you will get some LED in the mean of series and parallel combination.
Usually, we found it best if you install one stripe LED in series due to a constant current driver.
Can I Use A LED Light Directly As My Turn Signals Motorcycle?
You can use a LED light directly as a LED signal but remember it will create hyper-flashing. And, hyper-flashing is something annoying for other persons on the road around you.
Do I Need A Load Resistor For LED Turn Signals?
Yes, for every LED turn signal, you should use a resistor.
Conclusion
Installing a resistor for LED Turn Signals is appealing as long as you have some basic knowledge of it. However, we tried to cover all the steps to make you understand how to install resistors for led turn signals motorcycles.
Hopefully, now you know how to install a resistor for LED turn signals.
But, if you think that you are not confident about how to wire resistors for led turn signal, please meet any professionals. Or, you can take your motorcycle to a nearby workshop to take their help.