
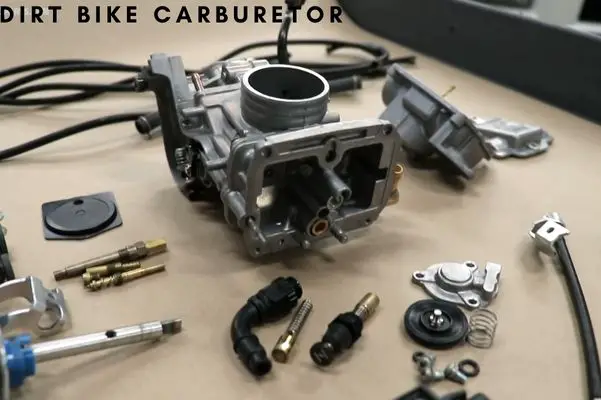
A carburetor is one of the essential parts of dirt bikes that regulates the power and the efficiency of the engine. A dirty carburetor affects the performance of your bike negatively and at certain points, it can cause dysfunction of the bike itself.
When your dirt bike engine does not give you the expected performance, you have to check the carburetor first to ensure whether it is the cause of the problem. If you discover that the problem is in the carburetor, you need to clean it.
Though the carb is a complex part of the dirt bike, you should not feel intimidated. If you follow the right steps, there is nothing to worry about. Just make sure that you have taken enough safety measures such as using goggles and hand gloves while dealing with the carb. Also, make sure that you have gathered the required tools before performing the cleaning process.
In this article, we are going to discuss two ways of dirt bike carburetor cleaning. After you complete reading this you will know how to clean a dirt bike carburetor either by removing the carb or not removing it. You will also get other related tips such as the cost, how do you know you need to clean the carb, why and how often you should clean the carb, and many more. Let’s go ahead.
How to Know If the Dirt Bike Carburetor Needs Cleaning?
Carburetors are the heart of the engines. They need regular cleaning. If you do not clean them regularly, you can’t expect them to be assisting the engine to keep working as it is supposed to do.
The dirt and gummy fuel residue around can easily bog down a carburetor. It will fail the engine or hinder the expected performance.
However, do you know when to clean a carburetor? Or, how do you know that your carburetor needs cleaning? Well, some signs will tell you that it’s the time to clean the dirt bike carburetor. So, what are the signs? Here are four common signs:
The engine will not start: If the carburetor is dirty, the chance is that the engine of your dirt bike will only turn over or crank, but will not start. In case the carburetor is extremely dirty, it becomes impossible for the fuel and the air to pass through to the engine. This causes the turnover but the engine does not start.
The engine will run lean: If there is an imbalance in the air and the fuel, the engine starts to run lean. 12:1 or 15:1 is the general air to fuel ratio that should be maintained to get the engine working flawlessly. When this ratio is not well-maintained and there is not enough fuel or the air is too much compared to fuel, you will hear the popping or sneezing sounds. And it happens mainly because the carburetor is not getting enough fuel.
The engine will run rich: if the engine of your dirt bike runs rich, the lean engine scenario is reversed. In this case, there is too much fuel in the carburetor and not enough air. You will experience the black smoke coming out from the exhaust when your engine runs rich.
The carburetor will get flooded: Dirt and debris are enemies to the engine. If the fuel bowl contains too much dirt and debris, the chance is that the needle valve will get blocked. As a result, it will not close.
When this is the case, fuel can come out and overflow into the carburetor easily. As a result, the air and fuel ratio loses balance. The spark plugs might also get wet due to the flow of the fuel from the bowl vents.
Other Issues: There are some other symptoms to understand that a carburetor is dirty. Poor idle, sputtering, overheating, backfiring, poor efficiency are some of the common signs that tell that your dirt bike carburetor needs to be cleaned.
Though the carburetor is not the culprit all the time, it is most often involved. So, make sure that the carburetor is clean and clear.
How to Clean a Dirt Bike Carburetor: Step by Step Guide

Are you ready to clean your dirt bike carburetor? Here’s our guide on how to clean a carburetor on a dirt bike step by step.
Step 1: Get the Necessary Tools
While cleaning a carb, you should always prioritize safety. Make sure that you wear safety glasses all through the cleaning process. You need to also have safety gloves so that you can keep your skin away from harmful chemicals. These chemicals can irritate your skin.
Once you have managed both the safety glasses and gloves, the next step is to clean the area where you are going to work. Arrange adequate light to make sure you are not in the dark.
When all is set up as required, you can start to work with cleaning the carb. Here are the set of tools you will require for DIY cleaning of a dirt bike carburetor:
- The service manual
- Rags
- Standard carburetor cleaner
- Allen Wrench or hex key
- Screwdriver
- A small set of screwdrivers
- Wrench and socket wrench
- Thread locker of medium or low strength
- Safety gloves
The service manual is essential to start working with the carburetor. If you do not know what kind or size of tools you need to work with a certain kind of carb, you will end up damaging it.
Finding industrial compressed air can be hard. If you cannot manage that, you can purchase and use pressurized air cans as well.
The tools you are going to use are not of a very advanced level. However, just make sure that you have got new screwdrivers as that will be required to remove the brass jets perfectly.
If your screwdriver fails to locate the brass jets, the chance is that those will get damaged for the wrong tool. The same is true for other parts if you use the incorrect tool.
Step 2: Remove the Dirt Bike Carburetor
Most of the bikes come with two bolts or circular clamps that help the inlet manifold of the bike to keep the carburetor in it.
Turn the Primary Fuel Supply Off
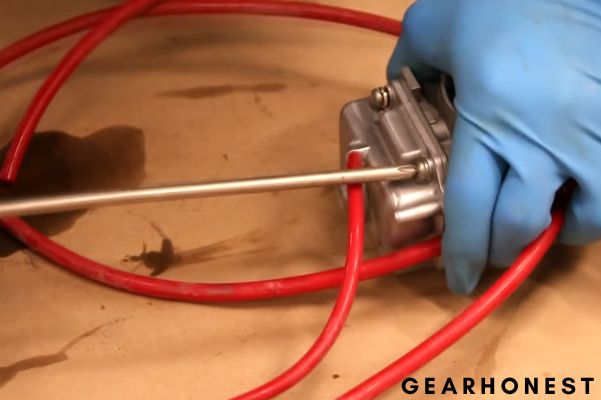
Before going to remove the dirt bike carburetor, you have to make sure that you have turned off the primary fuel supply. Use a hose and a mini screw so that you can drain the float chamber of the bike.
The control cable and slide of the carburetor can easily be removed when you are done with removing the carb.
Detach the Float Chamber
Now, it is time to detach the float chamber. You will see four or three screws retaining the float chamber when you turn it upside down. However, a wire clip is also common in many bikes. Remove those screws or clips.
To loosen the float chamber from the gasket, apply a sharp tap containing a plastic handle. If you can do it properly, the float chamber will get detached.
Work with Jets
When you have detached the float chamber, you can easily detect the primary jet or pilot jet, jets, main floats, and the overflow pipe. As floats are fragile and delicate, make sure that you start working at this phase by detaching them first.
Floats are generally made from plastic or brass. If your floats are made up of plastic, you have to check if there is any leakage there. Make sure that they are free from gasoline.
While you are detaching the pins from the carb, you have to be very careful as the aluminum stand supporting it is vulnerable. When you tap, support the tool from one portion.
Most of the carb features two jets. If any of the jets are blocked, you need either to clean or replace that.
Detach the Air/Fuel Adjustment Screw
You’ll also need to detach the air/fuel adjusting screw of the dirt bike carburetor. The screw on the engine side is for adjusting the fuel while the screw on the air filter side is to adjust the air.
Check the position of the tapered screw carefully before you remove it. Make sure that you can put back the screw in the same area when you reassemble the parts.
Step 3: Clean the Carburetor
When you have removed the carburetor and its parts, it is time to start cleaning it. The first thing where you should give your hand is the float bowl. Use a good carburetor cleaner and some rags to clean it thoroughly.
Inspect all the other body parts of the carb. Make sure that you have flushed all the holes with the carb cleaner. Use compressed air to blow through the parts to get them cleaned perfectly.
While cleaning the carb, make sure that you are wearing safety goggles and hand gloves to keep your body parts protected from the dirt particles and fluids ejected from the holes of the carb.
Step 4: Reassemble the Carburetor
To reinstall the carburetor again at its place, you have to just reverse the process you followed while you detached the carb. However, you have to do one extra thing. And that’s measuring the float heights properly before reassembling the float chamber.
The functioning of the engine along with the mixture is highly influenced by the height setting of dirt bike floats. You can bend the metal tang a bit if you need to adjust the height.
However, do not bend the metal tang too much. There is a chance that you might end up disconnecting the fuel delivery into the chamber. Follow the workshop manual to find out the appropriate height you need to aim for.
Another important thing to remember is to fine-tune the air adjusting screw of the carburetor. When you are done, start the engine. Wait till the engine warms up to the level of working temperature.
Now, if everything works fine, congratulations! You have cleaned your dirt bike carburetor successfully. If you find something wrong, you might need to disassemble, troubleshoot the issue, fix the problem, and reassemble again. If you are not confident enough for the second effort, consult any expert professional to do the work for you.
How Can You Clean the Carburetor without Removing It?
So, is there any way to clean the carb of your dirt bike without removing it? Fortunately, the answer to this question is, yes. You can clean the carburetor even if you do not want to remove it. If you are one of those who do not want to deal with the intake boots or throttle cable, you can use the process we are going to share. In this process, you do not require to get the carburetor completely detached from the dirt bike.
Take off the Pod Filters
First of all, you are to take the pod filters or airbox off. You can do it easily in a few minutes and then reinstall later on.
When you turn the throttle you will see the butterfly valves opening and closing. If you can remove them, you will have better access to the carburetor.
Take off the Bottom Bowl and Spray Carb Cleaner
Now, take the bottom bowl off from the carburetor by detaching the screws or the bolt. To prevent the gas from running out, turn the petcock off.
After detaching the bowl, try to spray some carb cleaner inside. Repeat it a few times after a few minutes of interval. It will help the grime and dirt get loose. Reassemble the bowl now and then turn on your dirt bike. If it works, great. If the problem persists, then detach the bowl again and continue the following process.
Take the Floats off
After removing the bowl once again, find out the floats inside the carb. Take them off to explore behind them. When you take the floats off, you will also see that a rocket-shaped part is also coming off.
Test the floats if they are still good to use. To check that they are working, you can take a bowl of water and see whether they float or not. If they do not float on the water, it means there are some problems there and you should better replace them with new ones. Otherwise, they might cause some mechanical issues later.
Locate the Jets and Clean
Look inside the carburetor and find out the jets. You will find at least one primary and one secondary jet there. Unscrew them and look through them to check if they are clogged. A clogged jet is one of the main culprits for the inefficiency of the carburetor.
Use the carb cleaner to clean the jet throughout. Make sure that the gunks inside are getting out. Use the cleaner several times with a few minutes of intervals.
Now, apply the carb cleaner on all over the carb, both inside and outside. Wait for a few minutes to get all the dirt out of the carb. When the cleaning process is done, now reassemble the jets, the float, and then the bowl of the bottom part.
Let’s See How it Works
When you have reinstalled all the parts, it is time to see how your dirt bike works. Start it and see how well your bike runs. When you get your desired result, install the intake filters now to complete the process.
Read more
Why Should You Clean The Carburetor?
Cleaning a dirt bike carb after a certain period will help your dirt bike attain the highest efficiency. A clean carb is essential for an easy start, no bogging, and getting the most of the fuel mileage and the power of the bike.
On the other hand, a dirty carb is responsible for the lean condition in the engine. This is the result of the imbalance in the fuel/air ratio. This is not good for any engine. It makes the engine run poorly. On top of that, a lean mixture of fuel/air can overheat the engine. If the engine gets too hot, there is a chance that a piston will get burned down.
How Often Should You Clean The Carburetor?
You might know that you need to go through the regular maintenance of your dirt bike parts. But, you might be confused about the meaning of ‘regular’ and types of ‘parts’ you should be concerned about.
Well, when it comes to a dirt bike carburetor, a rule of thumb is to tune it every two years. Except for this, there is nothing you can do except riding your bike regularly. It is really painful to disassemble and then assemble the carb again on your bike. So, you should just clean it when it requires cleaning. There are no hard and fast rules about the time when you should clean it. You can clean it either after a few months or years.
One important thing you should remember is that if you ride your dirt bike regularly, you might need to clean the carb less often. On the other hand, those who do not ride regularly might need frequent cleaning sessions. So, regular riding itself is the key to giving less time to the carburetor as it is a part of the cleaning mechanism.
If your dirt bike is not actively running on the road, it builds up more dirt and grime in the carb and it happens pretty quick. That’s why you have to make sure that your bike is not idle for too long.
Is Cleaning A Dirt Bike Carburetor Hard?
Whether it is very hard or not to clean a carb depends on a variety of factors. First of all, it depends largely on the bike. Secondly, your mechanical skill or efficiency also does matter. And thirdly, if you have a manual and you know exactly how to clean the carb, things will get easier for you.
Note that, if you take your dirt bike in a shop, you will need to pay them a huge sum of money. On the other hand, if you do it at home by yourself, you can save the money for something else.
What Is The Best Carburetor Cleaner?
You will find a variety of good brands out there who supply good carburetor cleaner for dirt bikes. You can choose from any of the good brands including the generic ones.
However, one thing you should remember while buying a carburetor cleaner is that you have to make sure that the cleaner you are buying contains chlorine. It is because chlorine is abrasive and it outputs a better result when it comes to cleaning a carb.
Does Brake Cleaner Clean Dirt Bike Carburetor?
Yes, a break cleaner can work to clean a dirt bike carb as well. One good advantage of brake cleaner is that it easily dries out. A brake cleaner is ideal to clean any grease, oil, or fluid. And that’s why a brake cleaner is effective for cleaning a dirt bike carb as well.
Using a brake cleaner for cleaning a carburetor is a safe alternative as it dissolves the grease and oil buildup without harming the parts.
How Much Money Do You Need To Spend To Clean A Dirt Bike Carburetor?
It depends largely on the type of carb and the bike you have. You can easily clean the carb by spending about 50 to 100 bucks if you do it from any garage. However, it is far cheaper if you DIY the cleaning process and then let them assemble the carburetor. You can buy a jug of cleaning solution with 20 bucks which lasts for a pretty long time.
Check our dirt bike recommendation for kids and teenagers
Best Gas Powered Dirt Bikes For Kids Of All Ages
Best Electric Dirt Bikes For Kids And Teenagers Motocross Rider Reviews
Dirt Bike For Teenager- Choice The Best Trail Dirt Bike Of All Time
Final Thoughts
By now you know all the details of how to clean a 2 stroke dirt bike carb. Follow the steps mentioned above carefully to get your dirt bike back to full-life again. However, make sure that you get all the plastic and rubber components of your dirt bike removed before you start the cleaning process. If it is because the cleaning solution can have a damaging effect on them.
Another thing you should do is replacing the fuel before you start after cleaning the carb. If you do not do so, you might end up going back to the same condition again.
A carb can be compared with a heart. It gets clogged by the residue of the fuel. Once you get your carb out of the dirt and gummy buildup, you will get back the lost efficiency of your bike. We hope that this step by step guide on how to clean a dirt bike carburetor will help you.
Most devices for motorcycles will also come with a wireless key logger. This lets you know exactly what the thief did as soon as you are able to get a hold of the motorbike. You can obtain this information through the GPS enabled mobile phone.
I have always felt intimidated by cleaning auto parts, especially my sons’ dirt bikes, but I can’t stand taking them to get cleaned professionally when I own my own cleaning business. After reading this, I feel a lot more confident to attempt these cleanings on my own. Who knows, maybe I could add on a new service if I master this new cleaning skill! Thanks!